Saturday, December 20, 2014

Our 27 Christmas Tree, 2014 Christmas Home Tour

Hi dolls! I hope you're all enjoying the most wonderful time of the year. I've been working so much that I feel like I'm so behind on Christmas. Fortunately we spent most of November's weekends getting our 27 Christmas trees up, but as far as Christmas cards, Christmas shopping, Christmas baking and Christmas wrapping goes, I've hardly started. Sigh - working girl problems. One thing I've been meaning to do for weeks is to give you all a Christmas home tour, which was our most popular post of the year last year. Now that I'm essentially on Christmas break, I've had a chance to get some photos together so y'all can take a peak into how crazy we are below.

To view our 2013 Christmas home tour - click here.
Trees not pictured below: Ross's 4ft burnt orange University of Texas tree in the garage and my 4 ft pink tree with shoe ornaments in my shoe closet.

While most of these photos (the low quality ones) were of course taken by me, any pretty ones you see were taken by my professional photographer aunt, Lisa Warren.

This is our 9 ft main tree, in our living room, with all red and gold ornaments. It was the subject of my recent post of Christmas tree decorating tips & tricks.


I lovingly refer to these 3 as "the triplets" - they're matching 6ft trees with all gold balls and gold reindeer ornaments


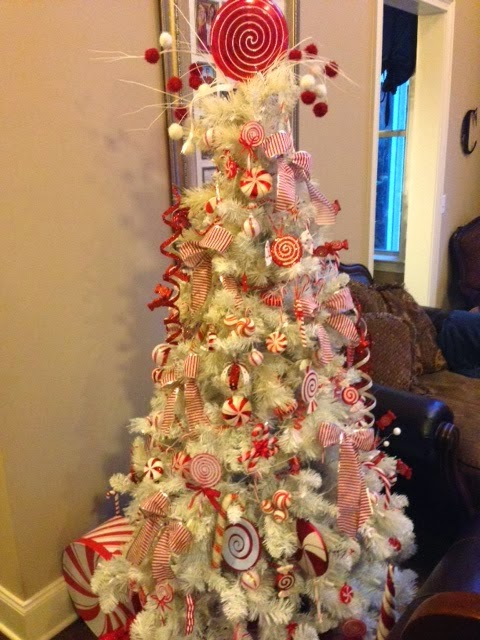
This 7ft tree with all peppermint ornaments is one of my favorites
This 6 ft white tree with purple, blue, pink and green ornaments, many of which are snowmen, is in our downstairs guest bedroom
This 7 ft red tree has all lime green, red and white ornaments and is in our foyer
This antique village was a gift from Ross's stepmom and it puts a big smile on my face every year
My dad and I in our foyer
This 14ft red and burlap decorated tree is our tallest, and is nestled into our spiral staircase in our foyer


this cute little 2 ft white tree has pink and grey ornaments to match our master bath

I put this 5 ft tree up every year in honor of my late grandfather, as it is covered in cardinals, his favorite bird. It's in our upstairs guest bedroom.
This tree is NEW this year! I'm so excited about it and these pictures really don't do it justice. It's under the sea themed, with blue/green glittery mesh ribbon, green and blue seaweed ornaments, pink glass "bubbles", sparkly aqua glass ornaments, lots of blue, green and pink tinsel, glittery fish, navy blue barnacle picks, translucent sea turtles and one red lobster. lol


This tree is another one of my favorites - it's 7 ft, flocked and features candy cane, lollipop, doughnut, cupcake, ice cream and candy ornaments. It's in our sunroom, off of our kitchen.

This tree is gold, brown and leopard print themed and is also in our sunroom
This tree is 7ft and black, with all white ornaments. It's in our black and white themed kitchen.


This tree is 6ft and features all rustic ornaments. It's a tribute to both of our moms, who both have mountain ties. I put three rustic mini-trees (not included in the 27 tree total) at the base.

Here's a tiny peak at our latest project and hubby's best work yet - our new wine cellar! This will be revealed in our next post! You can also kinda see a 4ft tall pink tree nestled in the corner by the staircase.
These two trees are in our library. They're both 6ft and green, with the one on the left featuring all dog related ornaments in honor of our 3 furry children and the tree on the right featuring all of our travel and childhood ornaments.
This tree is also in our library (yes, that means 3 trees in the library - I'm nuts) and it's peacock themed. I've been doing this tree since 2010, before the peacock craze took off, but at least its easier to find ornaments now.
This is also in our library - its a beautiful ceramic snow village that my mother in law handed down to us last year.
The following photos were taken in our formal living room aka "the lady cave"
These 2 7ft trees are in the turret of our formal living room. The one on the left has all iridescent fairy ornaments, the pink one has all pink ornaments, the one on the right has all light blue and silver ornaments.


This little 4 ft tree is in our downstairs half bath and features gold, red and brown glittery ornaments


These photos are all from our dining room, which has one 7 ft white tree with all white ornaments and one 6 ft silver pencil tree with all silver ornaments


Now for a couple shots from our recent Christmas party, where 65 of our closest friends came by and filled the BDH with Christmas spirit. <3


I made this fruit tree using an apple cut in half and a carrot as the frame and just added fruit by sticking toothpicks into the carrot and apple!

I made these mini apple and cherry pie tartlets by cutting pie crust into little squares, stuffing them into my mini-muffin pan, adding cherry and apple pie filling and throwing in a small slice of brie. They were super easy and yummy!

I also revamped our old front door wreaths by taking off all of the deco mesh off of the original wreaths (left is a before pic) and just reapplying them in a tighter way onto the same wreath frame (right side is an after). It was a great facelift for them and it required no new materials, just a little time.


I hope you've enjoyed this peak into our Christmas madness! We're definitely crazy, but you can't say we don't have Christmas spirit. 

Merry Christmas from our family to yours!

Sunday, November 30, 2014

Christmas Tree Decorating Tips & Tutorial!

Hey barbie dolls!

I hope you all had a lovely Thanksgiving and Black Friday! Hubby and I enjoyed an amazing Thanksgiving meal with my family. It has always been one of my favorite meals of the year, especially with my uncle and aunt cooking. Then we set out to score Black Friday deals all over North Raleigh, which I'm pleased to report we did.

In the most recent BDH blog survey, you ladies said you wanted more tutorials, or "tutes" as so many of my blogging peers call them. After thinking about it, I don't think there's anything I'm more qualified to tute than how to decorate a Christmas tree. With 27 of my own, it was hard to choose which one to use as an example, but I chose our red and gold, 9 ft, artificial living room tree.


Planning and Prep
  • Before diving in, make sure you identify a cohesive color scheme and/or theme and stick to it. For this tree, the colors are gold and red. For best results, don't deviate from your color scheme/theme at all (even if you find a really, REALLY cute gold, red and purple ornament at the ornament store).
  • Buy your supplies. The majority of my trees came from At Home (formerly known as Garden Ridge), but I've found high quality trees at great prices both before and after Christmas at Walmart, Hobby Lobby, Michael's and Kmart. If your tree isn't pre-lit, you'll also need lights. Make sure your light wire matches your tree's color (i.e. white wire with white trees, green wire with green trees). When picking out ornaments, I like to pick up things from several stores so things don't look like they all came from a boxed set. Bulbs make good filler ornaments, but make sure you mix in other types of ornaments that work with your theme. For non-bulbs, I like to have multiples of each type of ornament to make the tree look cohesive.
  • If your tree has been in storage, give it a few spritzes of Febreeze before decorating.
  • Always test your lights before beginning tree set-up (hubs and I have learned this lesson the hard way)
  • Find a good place to put your tree (or trees), remembering that corners require fewer ornaments than trees placed against a flat wall or floating in a big space. Plan for all angles your tree will be visible, not just the front. Consider access to outlets, long extension cords running through your house can be a hazard and aren't the cutest. Bonus points if you can position your tree to be visible through an exterior window or reflect in a big mirror. ;)
Set-up
  • For artificial trees, I learned early on from my tree-loving godmother to make sure you sufficiently "fluff" your branches to give your tree the fullness the photo on the box promised you it would have. Fluffing a tree involves making sure none of your branches are stuck together and spreading each branch into "starfish" to cover holes on all sides. 
  • Also make sure you don't have any limbs clearly pointing against the grain of the rest of the tree. 
  • Take a few steps back to identify holes, then manipulate the branches to fill those holes. If you can't fill them all, we've got more tricks to fill them later in this post.
  • Install your lights for non-pre-lit trees, working to make sure the lights are distributed evenly and the right end of the plug is hanging at the back, bottom of the tree so it can reach the outlet.

Decorating
  • Now the fun part! I always start my tree decorating with any mesh or ribbon patterns I have in mind and let everything else work around that. For example, with this tree, I have cascading vertical ribbon going down. Some people use pipe cleaner to attach the ribbon or mesh to the branches, but I've always preferred using the branch tips to tie each piece in place for a more natural look (but I don't think you have this option for natural trees).
  • I always like to incorporate mesh or ribbon to give the tree as many different materials as possible which makes it more dynamic, but if you don't plan on doing that, I'd say start with your biggest ornaments. Cascading large ornaments should come first (like my HoHoHos on this tree) since they take the most room. Make sure they're evenly distributed, with an emphasis of keeping them in the middle and bottom of the tree (big ornaments overwhelm tree tops). Also, big ornaments are perfect for blocking any big holes you have left. 
  • Make sure with all ornaments, especially the big ones, that they're embedded in the tree and not too far protruding from the tree's frame. This can cause balance issues and can disturb the tree's overall lines.
  • Don't forget ornament hooks! I can't say this enough, but make sure you use ornament hooks (they're like 200 for $1 at Walmart) on any ornament that doesn't have its own hook or ribbon already. Trying to put a branch through a tiny metal hole will almost always make the ornament hang in a non-natural looking way, which looks forced.
  • Once your bigger ornaments are in place and evenly distributed, work in any focal point ornaments you plan on using, keeping some key favorites at eye level. 
  • After the focal point or special ornaments, work in your filler ornaments, such as bulbs. Make sure your colors are evenly distributed (i.e. not too many of one color placed together). Keep smaller ornaments at the top, where they're more size appropriate and to make up for having more of the bigger ornaments at the bottom.
  • If your ornaments vary in finish (which is always a good thing - makes the tree more dynamic), make sure your matte, glossy and glittery ornaments are evenly distributed in the same way your colors are evenly distributed.
  • Now on to picks - one of the most important things you can do for your tree! I always do picks last to fill in any holes, put I could also see the benefit of doing them first as well, as they're great focal points. Picks make a tree so much more dynamic, and in my opinion, can turn a good tree into a great one. Walmart sells some picks, but Hobby Lobby is the mecca if you can get to one - they have several pick aisles! NC friends - the closest you'll find a HL is Burlington or Danville, VA... the struggle is real. Michael's also has a decent picks section, but the majority of theirs are pretty small.
  • Don't forget the tree skirt - tree legs aren't pretty! If you can't find what you like in stores or if the increasingly hefty skirt prices aren't working for your budget, go to the fabric store and pick up a yard or two of fabric, cut a line from one edge to the fabric's center, and swirl it around your tree, folding any corners under the rest of the fabric.
  • Don't forget the topper either! Here, anything you like goes, just make sure the size is proportional to your tree size (no tiny toppers on giant trees). Bows, stars, angels, pick clusters - anything special to you will work! For bows, make sure you purchase wire edge ribbon (otherwise crafting with it will be near impossible). Unless you're doing a mini tree, stick to 2 inches wide or wider.
  • For extra pizazz, coordinate your wrapping paper with your tree's theme or colors. It costs no more, just takes a little extra planning.

In Sum:
  • When it comes to Christmas trees, more is more. If you look around, you'll notice that trees with more ornaments and materials almost always look better than their more scanty counterparts.
  • The best trees are always the ones that mean something to you personally. I love this red and gold tree and it has become our living room tree because the first ornaments we bought together as a couple were red and gold and are incorporated into this tree. They're also my two favorite Christmas colors. Long story short: don't try to please others or do what you think is trendy on your tree, do what speaks to you and find a way to incorporate the ornaments or themes you love.
  • Dynamic Christmas trees are the prettiest Christmas trees. The more variation in material, finish, size and shape on your tree, the better it will look, I promise. To me, the best trees always include ribbon and/or mesh, bulbs of multiple sizes, specialized ornaments, picks and lights. 
  • A cohesive look is key. Try not to stray from your theme if you can help it.


    I've included a couple others from my 27 tree collection below for more styles and examples. :)


    I hope some portion of these tips have been helpful to each of you. Stay tuned for more tree reveals in the coming weeks. HAPPY DECORATING!
Related Posts Plugin for WordPress, Blogger...